Establishing seamless communication with customers is an important activity for any business and emails play a vital role in this process. We all want our sales & marketing process to function like a well-oiled machine, but one aspect of the process that is often tough to track is the effectiveness of emails. Do you know what your sales & marketing team is emailing customers? Just like calling customers via phone, your sales and marketing experts have their styles of communication. The emails they send to your customers are as important as what they are saying to them on the phone or in person. To overcome such issues you need to standardize your email process so there is no ambiguity of thoughts. Here you need ready to use email templates which brings uniformity and saves time.
Salezshark has introduced the Email Templates Module that includes ready to use email templates allowing users to send templates both in transactional i.e. one on one emails and in bulk emails while sending campaigns. Users can create and save their own templates in the repository. They can edit & use existing templates from the gallery. These email templates can be created in Email Text Editor with an option to add HTML source, attach links, etc. These templates can be saved in Folders that will serve as a Template Repository. Templates can be shared as Public for other users to use these as templates. The basic features include:
- The Administrator or a user with the “Template section” permission will be able to use this tool.
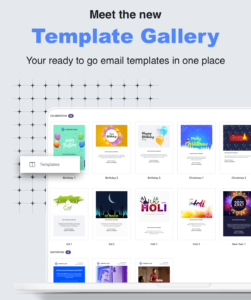
- New Template Gallery has been added to the Module.
- Users can create HTML templates from ready to use “HTML templates” from Templates Gallery.
- Users can now preview the template from the templates listing page.
- Users can now choose the Created Templates from both transactional i.e. one on one emails and in bulk emails while sending campaigns.
STEPS TO USE TEMPLATE MODULE
In the Marketing Section, click on the Template option.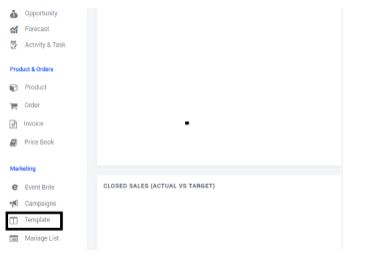 The template module page will open.

Let’s Explore Few features Available in the Template Module
In the Template Section, New Template can be added by clicking on the New Template option.
Select the module for which the Email template has to be created from the drop-down list
In the Template Section, Users can Search the Template by name.
In the Template Section, User can view the Number of Templates: All Template, Favorite Template, Created By me Template, Share with Me Template and Public Template
In the Template Section, the User can create the folder for Template.
User can add a folder by typing the folder name and click on the Plus Sign. A folder will be added
Note:
By creating a new folder, you can categorize the templates by adding similar templates to the folder. You can create a folder when you want to save a template or move templates from one folder to another. You have default folders in Email Templates like All, Favorites, Public, Created by me and Shared with me
Now, let’s create a template
-Click on the new template
-A New Template Gallery page will open.
-Users can select any template as per their need and edit that template as per their requirement.
-A Create New Template Pop will open.
-Select the Module, Template Name and Template Subject.
-Click on the next button.
-An Email Text Editor will open.
-Users can change the module and Subject from the Text Editor as per requirement.
Note:
An Email-text editor is an interface for editing which presents the user with a “what-you-see-is-what-you-get” (WYSIWYG) editing area. The aim is to reduce the effort for users to try to express their formatting.
-An Email Text Editor provides various options to the user. Users can add HTML source, Attached links, Forms etc.
-Add the content you wish to add in the editor box.
-Once the Content is added user can preview using the preview button.
Note:
Users can view the preview of the template, making it easier for user to view one template after another. With this, User can get an idea of how the template looks and how well it is performing, helping you in deciding if any improvements have to be made.
-A new page opens to show the preview of the content.
-Once the content is previewed, the Template can be saved.
-A Save Template Pop- up will appear
-If you wish to move this Template to any Specific folder, click on the move folder. A list of the folder will open, in which you move this template
Note:
If the folder is not available you can create a new folder by using create new folder. Type the name of the folder and click on the add Sign, a folder will be added.
-Users have the option to make the template Public or Private. By default, all the templates are Private.
-If you wish to make Template Public, click on the Toggle to make it Public
-Once the folder is selected and Template is marked as public, click on the Save button.
-Added Template will show in the list as Public Template.
Note:
If the templates are marked as Private. By default, all the templates are Private
Added Template will show in the list as Private Template.
Now, let’s create an HTML Template from Template Gallery.
-Click on the new template
-A New Template Gallery page will open.
-Users can select any template as per their need and edit that template as per their requirement.
-A Create New Template Pop will open.
-Select the Module, Template Name, and Template Subject.
-Click on the Next button.
-An Email Text Editor will open.
-Users can change the module and Subject from the Text Editor as per requirement.
Note:
An Email-text editor is an interface for editing which presents the user with a “what-you-see-is-what-you-get” (WYSIWYG) editing area. The aim is to reduce the effort for users to try to express their formatting.
-An Email Text Editor provides various options to the user. Users can add HTML source, Attached links, Forms etc.
-Add the HTML Source in the editor box.
-Once the Source is added user can preview using the preview button.
Note:
Users can view the preview of the template, making it easier for the user to view one template after another. With this, Users can get an idea of how the template looks and how well it is performing, helping you in deciding if any improvements have to be made.
-A new page opens to show the preview of the content.
-Once the content is previewed, the Template can be saved.
-A Save Template Pop- up will appear
-If you wish to move this Template to any Specific folder, click on the move folder. A list of the folder will open, in which you move this template
Note:
If the folder is not available you can create a new folder by using create a new folder. Type the name of the folder and click on the add Sign, a folder will be added.
-Users have the option to make the template Public or Private. By default, all the templates are Private.
-Once the folder is selected and Template is marked as Private, click on the Save button.
-Added Template will show in the list as Private Template.
-Users can share the template, Edit the template, Delete the template and Move the template
Note:
Users can only delete a Private template created by them only.
-Click on the template to see the detail of the Template.
-Users can share the template, Edit the template, and Delete the template from the detail page as well.
Let SalezShark Email Marketing CRM help your business that results in reduced operational costs, better client retention & improved productivity with AI-driven sales automation platform. Contact us to know more about SalezShark and receive CRM advice from our expert consultants.